# 搭建第一个vite项目 vite
$ npm init vite@latest
or
$ yarn create vite
or
$ pnpm create vite
2
3
4
5
npx degit user/project my-project
cd my-project

npm install
npm run dev
2
3
4
5
# vite配置文件vite.config.js
// vite.config.js
import { defineConfig } from "vite";
import vue from "@vitejs/plugin-vue";

// https://vitejs.dev/config/
export default defineConfig({
  plugins: [vue()],
});
2
3
4
5
6
7
8
9
# base 基础路径
开发和生产环境的公共基础路径
-绝对路径
-相对路径
-完整路径
以斜杠开头,如果在linux服务器上存在一个隐患,以/root开头,就是不知道能不能访问到,所以配置一个基础路径
// vite.config.js
import { defineConfig } from "vite";
import vue from "@vitejs/plugin-vue";

// https://vitejs.dev/config/
export default defineConfig({
  base: "./",
  plugins: [vue()],
});
2
3
4
5
6
7
8
9
10
配置前路径:"/src/assets/logo.png"
配置后路径:"./assets/logo.png"
# resolve.alias (alias 路径别名)
resolve.alias是和base同级别的resolve对象下的alias配置
// vite.config.js
import { defineConfig } from "vite";
import vue from "@vitejs/plugin-vue";
import { resolve } from "path"; // 添加引入resolve,path.resolve() 方法会把一个路径或路径片段的序列解析为一个绝对路径。

// https://vitejs.dev/config/
export default defineConfig({
  base: "./",
  plugins: [vue()],
  resolve:{
    alias:{
      comp:resolve(__dirname,'/src/components'),//__dirname项目的绝对路径,
      "/icon": "./src/assets",//静态文件添加 例如:icon,不能使用resolve的方式
      // icon:resolve(__dirname,'/src/assets'), //* 坑!!! 开发模式图片不显示,报错 http://localhost:3000/icon/logo.png 404 (Not Found),打包OK

    }
  }
});
2
3
4
5
6
7
8
9
10
11
12
13
14
15
16
17
18
使用方式:
组件引入
import HelloWorld from "./components/HelloWorld.vue";//before 使用相对路径
import hi from "comp/hi.vue";//after 使用绝对路径
2
图标引入
<img alt="Vue logo" src="./assets/logo.png" /> <!--before -->
<img alt="Vue logo" src="/icon/logo.png" /> <!--after -->
2
# 生产环境移除console.log配置build.terserOptions
开发环境的console.log没有清除,生产环境配置不显示出来 drop_console
//vite.config.js
export default defineConfig({
  base: "./",
  plugins: [vue()],
  resolve:{
    alias:{
      comp:resolve(__dirname,'/src/components'),
      "/icon": "./src/assets",
    }
  },
  build:{
    minify: "terser",//默认为esbuild,* 坑!!! terserOptions必须配置为terser才起作用
    terserOptions: {
      compress: {
        // 生产环境时清除console.log
        drop_console: true,
        // 生产环境时清除debugger语句
        drop_debugger: true,
      },
    },
  }
});
2
3
4
5
6
7
8
9
10
11
12
13
14
15
16
17
18
19
20
21
22
23
# 输出文件配置 build.rollupOptions
rollupOptions.output
配置前打包,img,css,js混合在assets文件下
配置后打包,静态文件按照文件后缀分类
//vite.config.js
build: {
    minify: "terser",
    terserOptions: {
      compress: {
        drop_console: true,
        drop_debugger: true,
      },
    },
    rollupOptions: {
      output: {
        chunkFileNames: "assets/js/[name]-[hash].js",//出口文件 assets->js
        entryFileNames: "assets/js/[name]-[hash].js",//如口文件
        assetFileNames: "assets/[ext]/[name]-[hash].[ext]",//静态文件 [ext]以文件后缀分类文件夹
      },
    },
  },
2
3
4
5
6
7
8
9
10
11
12
13
14
15
16
17
# mock配置
1、安装mockjs
node version: >=12.0.0
vite version: >=2.0.0
yarn add mockjs
# or
npm i  mockjs -S
2
3
2、安装 vite-plugin-mock
yarn add vite-plugin-mock -D
# or
npm i vite-plugin-mock -D
2
3
3、安装axios
yarn add axios
4、配置
//vite.config.js
import { viteMockServe } from "vite-plugin-mock";

export default defineConfig({
  base: "./",
  plugins: [
    vue(),
    viteMockServe({
      // default
      mockPath: "mock",// 类型: string;默认: 'mock';设置存储模拟 .ts 文件的文件夹;如果watchFiles:true,则将监视文件夹中的文件更改。并实时同步到请求结果;如果 configPath 有值,则无效
      // localEnabled: command === 'serve',//(不需要)本地启用;类型: boolean;默认: command === 'serve';设置是否开启本地mock .ts文件,不要在生产环境打开
    }),
  ]
})
2
3
4
5
6
7
8
9
10
11
12
13
14
5、根目录下新建mock文件夹,新建index.ts文件
//index.ts
import { MockMethod } from 'vite-plugin-mock'
export default [
  {
    url: '/api/get',
    method: 'get',
    response: ({ query }) => {
      return {
        code: 0,
        data: {
          name: 'vben',
        },
      }
    },
  },
] as MockMethod[]
2
3
4
5
6
7
8
9
10
11
12
13
14
15
16
6、使用
import axios from "axios";
async function fn() {
  const { data } = await axios.get("/api/get");
  console.log(data); //{code:0,data:{name:"vben"}}
}
fn();
2
3
4
5
6
# proxy配置前端跨域代理
server.proxy
// vite.config.js
export default defineConfig({
  base: "./",
  plugins: [
    vue(),
    viteMockServe({
      // default
      mockPath: "mock",
    }),
  ],
  resolve: {
    alias: {
      comp: resolve(__dirname, "src/components"),
      "/icon": "./src/assets",
    },
  },
  build: {
    minify: "terser",
    terserOptions: {
      compress: {
        // 生产环境时清除console.log
        drop_console: true,
        // 生产环境时清除debugger语句
        drop_debugger: true,
      },
    },
    rollupOptions: {
      output: {
        chunkFileNames: "assets/js/[name]-[hash].js",
        entryFileNames: "assets/js/[name]-[hash].js",
        assetFileNames: "assets/[ext]/[name]-[hash].[ext]",
      },
    },
  },
  server: {
    proxy: {
      // 三种写法
      // 选项写法,/req可自定义
      "/req": {
        target: "http://home-user-api.ahdev.guahao-test.com",//跨域域名
        changeOrigin: true,
        rewrite: (path) => path.replace(/^\/req/, ""), //匹配到/req开头,就替换掉
      },
      // 正则表达式写法
      "^/fallback/.*": {
        target: "http://home-user-api.ahdev.guahao-test.com",
        changeOrigin: true,
        rewrite: (path) => path.replace(/^\/fallback/, ""),
      },
      // 使用 proxy 实例
      "/ss": {
        target: "http://home-user-api.ahdev.guahao-test.com",
        changeOrigin: true,
        configure: (proxy, options) => {
          console.log("--", proxy, options);
          // proxy 是 'http-proxy' 的实例
        },
      },
    },
  },
});
2
3
4
5
6
7
8
9
10
11
12
13
14
15
16
17
18
19
20
21
22
23
24
25
26
27
28
29
30
31
32
33
34
35
36
37
38
39
40
41
42
43
44
45
46
47
48
49
50
51
52
53
54
55
56
57
58
59
60
61
62
使用
// index.js
import axios from "axios";
async function fn() {
  // 没有跨域问题
  const { data } = await axios.get("/api/get");
  console.log(data); //{code:0,data:{name:"vben"}}

  // 跨域
  // const data1 = await axios.get("http://home-user-api.ahdev.guahao-test.com");
  // console.log(data1);

  // 使用代理
  const data2 = await axios.get("/req");
  console.log(data2);
}
fn();
2
3
4
5
6
7
8
9
10
11
12
13
14
15
16
17
# env环境变量配置
根目录新建 .env.development 和 .env.production 文件
.evn
加载的环境变量通过 import.meta.env 暴露给客户端源码
变量名只能以 VITE_ 为前缀,为了防止意外地将一些环境变量泄漏到客户端
// .env.development
//自定义字段名VITE_BASE_URL
// /api/get 本地mock接口地址
VITE_BASE_URL=/api/get
2
3
4
// .env.production
// /api/get 本地mock接口地址
VITE_BASE_URL=http://home-user-api.ahdev.guahao-test.com //1、无需跨域,正式域名
VITE_BASE_URL=/req //2、域名跨域,使用代理
2
3
4
使用
  import axios from "axios";
  async function fn() {
    const data3 = await axios.get(import.meta.env.VITE_BASE_URL);
    console.log(import.meta.env.VITE_BASE_URL, data3);
  }
  fn();
2
3
4
5
6
7
# cdn打包配置
配置cdn打包的意义在于开发环境下按照正常的开发步骤去走。但是一旦打包,则走的是CDN的形式,仅打包element-plus的使用模块包。
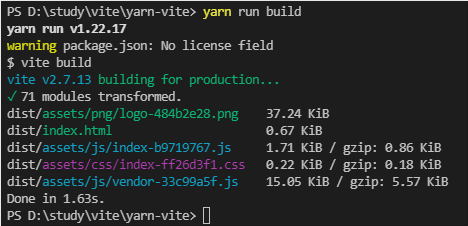
element-plus全局引入打包前体积约为700多kb,太大了,但是按需引入,打包时间太久,所以使用cdn配置打包,仅打包已使用,打包后为15kb(使用的模块越多越大),打包速度也快
打包前:

打包后:

npm install vite-plugin-cdn-import --save-dev

or yarn

yarn add vite-plugin-cdn-import -D
2
3
4
5
配置
// vite.config.js
import importToCDN from "vite-plugin-cdn-import";

 plugins: [
    vue(),
    importToCDN({
      modules: [
        {
          name: "vue", //需要将vue也配置,按照官网上的配置会有问题,
          var: "Vue",
          path: "https://unpkg.com/vue@next",
        },
        {
          name: "element-plus", //配置element-plus
          var: "ElementPlus",
          path: `https://unpkg.com/element-plus`,
          css: "https://unpkg.com/element-plus/dist/index.css",//此处引入css后,main.js中不用引入
        },
      ],
    }),
  ],
2
3
4
5
6
7
8
9
10
11
12
13
14
15
16
17
18
19
20
21
# gzip代码压缩配置
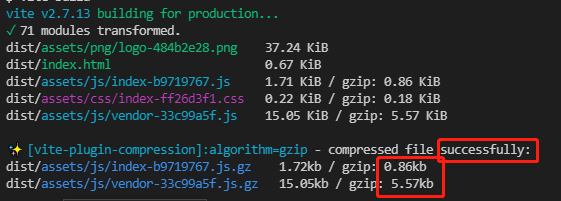
上一步cdn打包后压缩至15kb,通过gzip压缩后为5.57kb

// node version: >=12.0.0
// vite version: >=2.0.0

yarn add vite-plugin-compression -D
or
npm i vite-plugin-compression -D
2
3
4
5
6
// vite.config.js

import viteCompression from "vite-plugin-compression";
plugins: [
    vue(),
    viteCompression(),//配置gzip
],
// 其它配置项
// viteCompression({
//     verbose: true,
//     disable: false,
//     threshold: 10240,
//     algorithm: "gzip",
//     ext: "gz",
// }),
2
3
4
5
6
7
8
9
10
11
12
13
14
15
# 图片压缩打包
安装 vite-plugin-imagemin
node version: >=12.20.0
vite version: >=2.0.0
yarn add vite-plugin-imagemin -D
or
npm i vite-plugin-imagemin -D
2
3
配置
// vite.config.js
import viteImagemin from 'vite-plugin-imagemin';

export default () => {
  return {
    plugins: [
      viteImagemin({
        gifsicle: {
          optimizationLevel: 7,
          interlaced: false,
        },
        optipng: {
          optimizationLevel: 7,
        },
        mozjpeg: {
          quality: 20,
        },
        pngquant: {
          quality: [0.8, 0.9],
          speed: 4,
        },
        svgo: {
          plugins: [
            {
              name: 'removeViewBox',
            },
            {
              name: 'removeEmptyAttrs',
              active: false,
            },
          ],
        },
      }),
    ],
  };
};
2
3
4
5
6
7
8
9
10
11
12
13
14
15
16
17
18
19
20
21
22
23
24
25
26
27
28
29
30
31
32
33
34
35
36
# eslint,prettier 代码格式配置

// 待补充
新建.eslintrc.js
// .eslintrc.js
// 待补充
2
新建.prettier.js
// .prettier.js
module.exports = {
  printWidth: 80, //单行长度
  tabWidth: 2, //缩进长度
  useTabs: false, //使用空格代替tab缩进
  semi: true, //句末使用分号
  singleQuote: true, //使用单引号
}
2
3
4
5
6
7
8
# vscode共享配置
.vscode执行文件,新建项目默认生成
.vscode下文件extensions.json 是建议安装的扩展文件
// extensions.json
{
  "recommendations": ["johnsoncodehk.volar"],//推荐使用的插件列表,例:在vscode插件中搜索johnsoncodehk.volar安装使用
}
2
3
4
5
下载github上的文件,如果有多个推荐使用的扩展插件
简便方法:vscode扩展插件中选择筛选,筛选条件是推荐,可一次性预览,未安装的可选择安装
新建settings.json配置文件,同步代码规范,减少代码冲突,优先于本地settings
// settings.json
{
    "editor.tabSize": 2,
    "html.format.wrapLineLength": 300, //html文本长度
    "editor.detectIndentation": false,
    "files.exclude": {
        "node_modules": true,
        "dist": true,
        "cypress": true,
        "package-lock.json": true
    },
    "beautify.config": {
        "brace_style": "collapse,preserve-inline" //大括号自动换行问题
    },
    "editor.mouseWheelZoom": false,
    "eslint.validate": [
        "javascript",
        "javascriptreact",
        "html",
        "vue"
    ],
    "editor.codeActionsOnSave": {
        "source.fixAll.eslint": true
    }
}
2
3
4
5
6
7
8
9
10
11
12
13
14
15
16
17
18
19
20
21
22
23
24
25